JP1/ITDM2 or Job Management Partner 1/IT Desktop Management 2 automatically collects various types of information, allowing you to manage it all at one place. The information that can be collected by this product includes information about hardware, software, and security. You can use the product to manage information not only from PCs and servers, but also from an increasingly diverse array of IT assets, including anything from virtual desktops to smart devices. With JP1, you can efficiently detect devices when they are first connected to the network, as well as automatically apply changes made to management devices, to ensure that management information is always kept up to date. Moreover, JP1 helps ensure that licenses are managed properly.
Here i will be focusing on a few of the asset management topics ,i.e, making use of JP1’s functions to better manage the IT assets and security management topics ,i.e, using JP1’s data collection and protective security measures to manage the health of PC. Below you can find the asset management features followed by security management features of JP1.
- Manage all the IT assets in one place
- Manage software licenses
- Manage contract information
- Optimize your inventory processes
- Control devices remotely
- Distribute and install software
- Install and manage Windows feature updates
- Manage smart devices
- Ensure compliance with security measures
- Keep a log of operations
- Restrict the use of USB memory devices
- Control network connections
- Implement thorough virus protections
- Install and manage Windows quality updates
Installation
In order to get started with JP1, the first step would be to install the JP1/IT Desktop Manager 2 – Manager on the server that will be called the management server. Once the installation is complete, the next step would be to install the Remote Installation Manager on the administrator’s PC. Remote installation manager is used to distribute files. On the administrator PC, register the product license from the login window using the License button. After the product license is correctly registered, the URL in the below format can be used to login to the JP1/IT Desktop Management 2 operation window.
http://management-server’s-IP-address-or-host-name:31080/jp1itdm/jp1itdm.jsp
Before you start managing the users PC, make sure that JP1/IT Desktop Management 2 – Agent is installed on each of those computers. Computers on which JP1/IT Desktop Management 2 – Agent is installed can be managed safely. Remember to install JP1/ITDM 2 – Agent and the Packager on the administrator’s PC. Agent installation is needed as administrator’s PC is also subject to management. The Packager is used to distribute files remotely.
JP1 Operation Window
Enter the user name and password on the login screen to login to the JP1 operation window. If it is a first time login, password change prompt will show up, else JP1 home screen will be displayed. Here you can find the options as shown in the figure below.
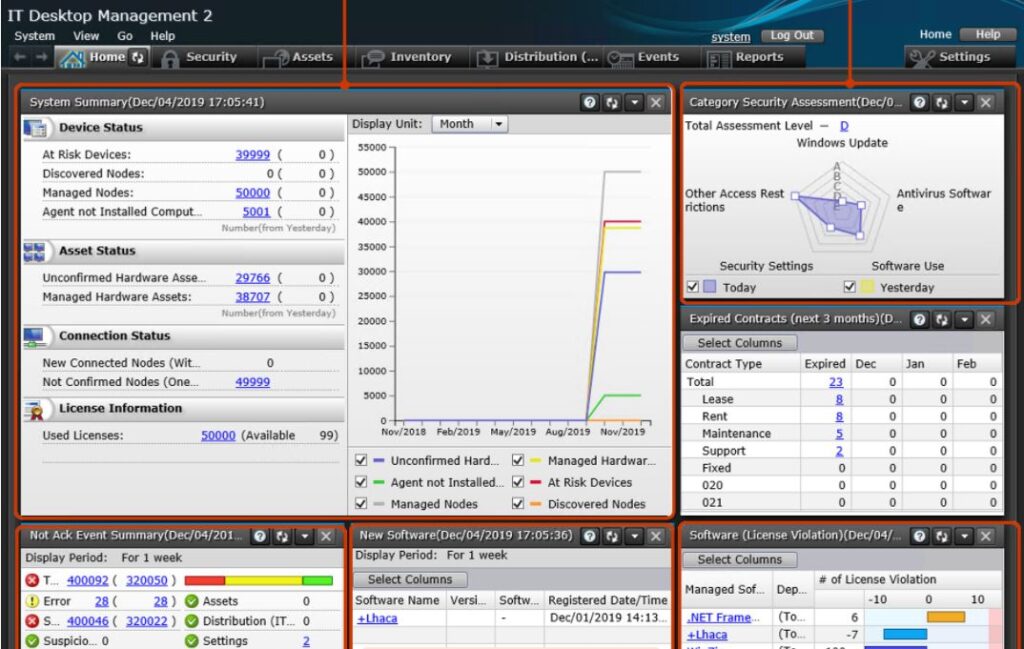
On the Home screen dashboard you can see important notifications and a summary of any changes made to the system as compared to the previous day w.r.t hardware, software and security. On the Security tab, new policies can be applied for device usage, operation log of a particular device can be obtained. On the Assets tab, new device registration and searching of JP1 registered/installed assets like PC, printers, IP phones etc can be performed. On the Inventory tab, JP1 installed PCs/Servers will show up. One can check the online/offline status and other information about the PC here, the administrator can also remotely access the online user PC from here. The Distribution(ITDM) tab can be used to manage software packages on user PC.
Under the Events tab, all the events w.r.t device usage on a PC, program updation or security judgement while JP1 is running will be displayed as an event here with user & device information. Under the Reports tab, you can extract information based on your purpose. The reports that can be generated are; summary report, security diagnosis report, security details report, inventory details report and asset details report. Finally, the Settings tab can be used to scan the network for any new PC/device connection. Devices with or without JP1 installed can be detected here. Also multiple devices with the same IP address can be detected.
Features
In this section i will brief on a few of the features that belong to either the asset management or the security management category.
Manage all the IT assets in one place
With JP1, you can automatically collect information about hardware devices and software programs over the network. In addition to on-premise devices connected to the network, you can also manage notebook computers that are occasionally connected to the network, as well as notebook computers, thin clients, and smart devices that are taken off-premises for remote work. Even contract-related information (such as the contract type and period) can be registered and managed in association with the relevant IT assets.
Manage software licenses
JP1 can automatically identify what software is installed on managed PCs and then incorporate this information to show you the number of licenses you own, the number of licenses in use, and the number of licenses still available. You can check this data to make sure you are not using any software programs in excess of the licenses that you have purchased. JP1 also allows you to identify the PCs on which a program has been installed but to which no license has been allocated. This can be checked under, Assets > Managed Software > Managed Software List.
Optimize inventory process
JP1 can be used to collect information about the type of devices being used at your company, including PCs and servers. You can keep data about your IT assets up to date simply by registering new devices and maintaining information about persons managing existing devices. You can also output this information to a list that can be used when checking for actual devices, making inventory processes more efficient. Under Reports, Inventory details report and asset details report can be generated for this purpose.
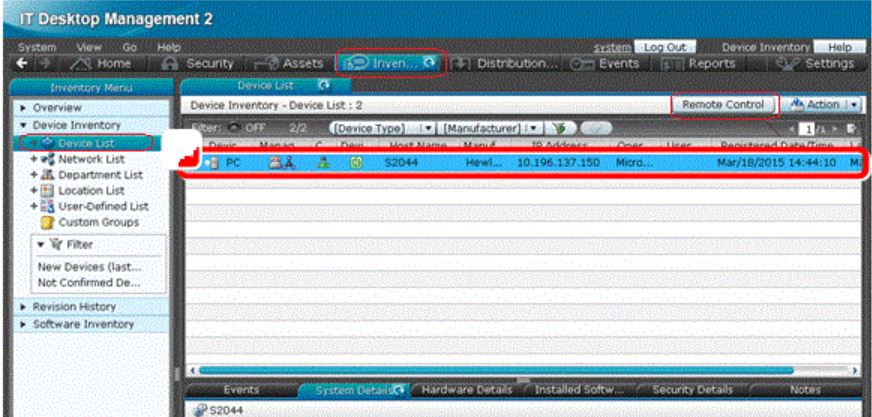
Control devices remotely
When a problem occurs on a PC at a remote site, you can solve the problem remotely from the convenience of your own desk. Remote connectivity allows you to send and receive required data to and from PCs. You can even record a video of your remote operations to use later when explaining the process to other users. User PC can be accessed from the Inventory option as shown in the below picture. Select the online user PC from the device list and the Remote Control button will become active. Click the button to access the user PC remotely.
Distribute and Install Software
You can use JP1 to automatically distribute and install software on your company’s remote PCs and servers. JP1 provides a wide array of functions that allow you to distribute software to only a specific subset of PCs (for example, PCs belonging to a particular department) and to specify the date and time when software is to be distributed and installed. With these and many other detailed settings, JP1 allows you to customize your software distribution operations.
In order to distribute software to a single PC remotely, select the option Distribution(ITDM) > Task and click on Add package distribution task sub menu. From the list select the relevant package to be installed. The task name and PC details need to be entered to start the task. Once the task is complete, cross check the installation under Inventory, Device List > Installed Software information or Revision History > Revision History List of the device.
Manage smart devices
JP1 allows you to collect information from smart devices (such as smartphones and tablets) and manage them together with other devices such as computers and servers. You can even remotely control smart devices by, for example, installing applications, locking or initializing lost devices, and resetting forgotten passcodes. The method of granting access to a smart phone to connect to the company network is mentioned in the Assigning Policy section below.
Ensure compliance with security measures
With JP1/IT Desktop Management 2, you can collect information from managed PCs, such as information about security vulnerabilities, prohibited operations and information leakage. JP1 helps you form a clear picture as to whether the security risks facing each of your PCs are being effectively mitigated. Navigate to Security > Dashboard to access the below window.
You can use Security > Security Policies to create and assign policies to groups to judge the security status. Security > Computer Security Status to assign security policies to individual PCs and Security > Windows Update to manage windows security updates.
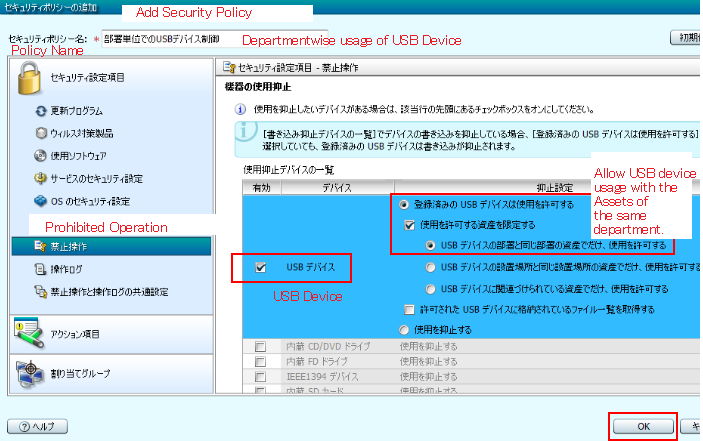
Expanding more on security policies ,i.e., the policies can be applied not only to groups but also to individual PCs. The point to note here is, a different policy applied to an individual PC overrides the group policy. In case of USB memory device registration, a new policy can be created and set such that its usage can be restricted only to a particular department PCs. Even each PC of the department can be assigned different device usage policy.
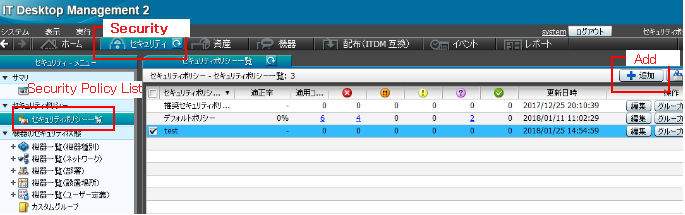
Just click on the Add button in the above figure, that will open the below window where the necessary usage policy for the USB device can be created.
I will discuss more on assigning policies to USB memory devices later on.
Keep a log of operations
Operations that allow someone to obtain internal company information, potentially disclosing such information to parties outside the company, pose a risk of information leakage. JP1 identifies these types of operations as “suspicious operations” and notifies administrators, who can then trace the operations by examining the operations logs. One can access the logs by navigating to Security > Operations Log List. The point to note here is that, only the operation logs collected on the management server can be viewed.
Restrict the use of USB memory devices
With JP1, you can permit the use of only USB memory devices owned by the company, prohibiting the use of all other USB memory devices. In other words, if someone inserts an unauthorized USB memory device, use of the device will be disabled. This feature limits the ability of USB memory devices to act as a pathway for information to leak outside the company. JP1 also allows you to check a list of the files stored on each USB memory device that you are managing.
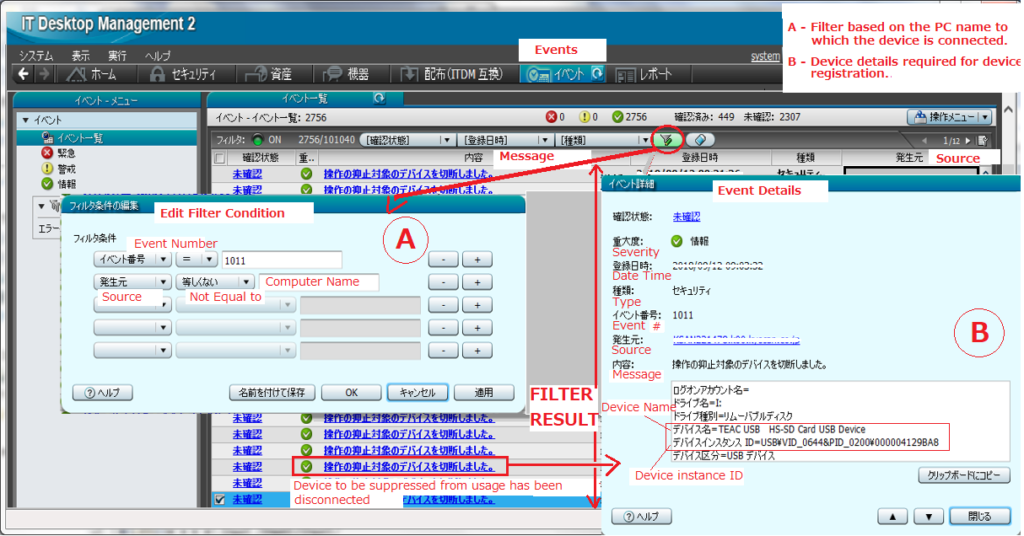
Now let us consider an example wherein a new USB memory device is connected to a PC. The first step would be to navigate to Events tab and click on the edit filter condition (section A) button to enter the Event Number, PC name. The event number 1011 displays security information wrt any new device connection. Once the OK button is clicked, the filter result will display the event list wrt to the PC name and event number entered earlier.
The section B in the above picture displays the event details wrt to any event in the event list. This can be opened just by clicking on the relevant event message in the filter result section. The information needed for device registration ,i.e., the device name and device instance id is to be noted down from the event message “操作の抑止対象のデバイスを切断しました” or Device usage blocked message .
Encrypted device registration/Model registration : The USB memory is of encrypted(Eg: 256bit AES) and non-encrypted type. The registration method varies for each. First, we will look into the registration of encrypted devices. Based on the information obtained from the event log earlier, the inventory name is to be entered as shown in the below figure.
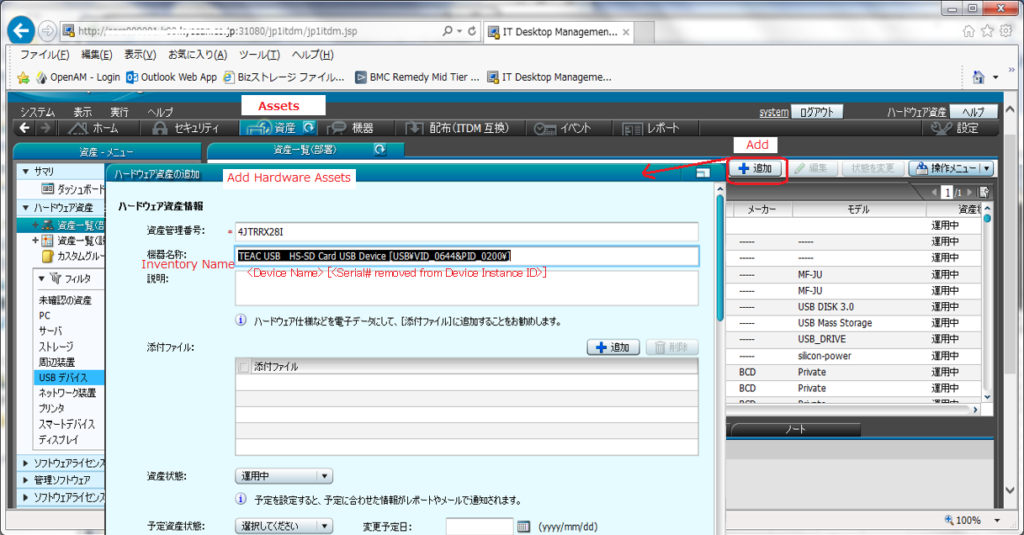
More information needs to be entered after scrolling down on the Add hardware Assets window. The necessary information is marked in red as shown in the below picture after which the submit button is clicked.

Non-encrypted device registration/Serial registration: In case of non-encrypted device, the device registration is done as shown in the figure below. First the Inventory name is entered as per the format marked in red.

Scrolling down further in the same window, a few more details need to be added. The required information like Inventory type, Model, Maker, Serial number and Device Instance ID is entered in the format as shown below. Once complete, click on the submit button to register the memory device.

Quick registration or Multiple device registration: In case you want to quickly register a USB device or you have more than one device to register, JP1 provides a solution in the form of agent for online management. This function can be accessed by navigating to Windows Start menu > All Programs > JP1_IT Desktop Management – Agent > Administrator Tool > Register USB Device. If password protection is set, the default password would be manager.

Once logged in with the password, the above left window appears. The black frame and red frame shows the status when USB device is not connected and connected respectively. Once the device is detected and selected, click on the register button. Now the above right window appears, wherein the OK button needs to be clicked to register the device. Finally, login to JP1/ITDM2 and navigate to Assets module as shown below.
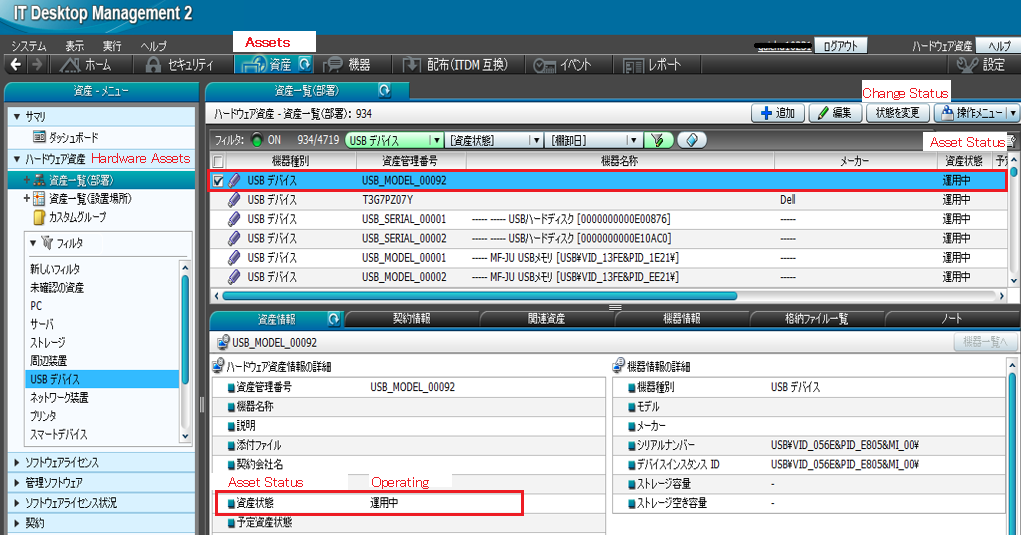
On JP1, the initial status will be in Unconfirmed state. Change the Asset Status of the registered USB device to something other than Disposed. Usually the status will be changed to Operating state using the Change Status button.
Assigning Policy : Once the device is registered in any of the above methods, it may not yet be ready to use. Each of the USB device either external or internal to the PC, can be assigned an appropriate policy as follows.
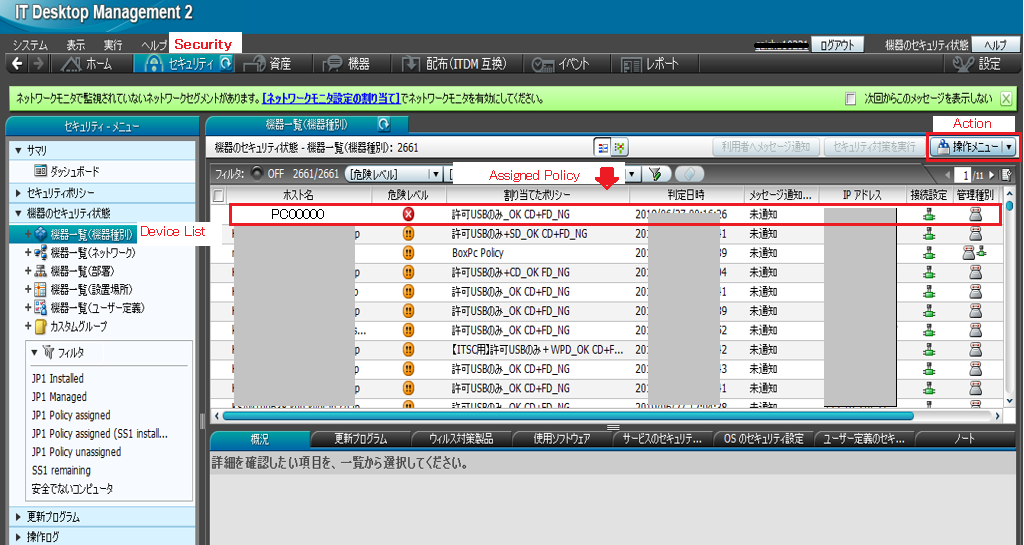
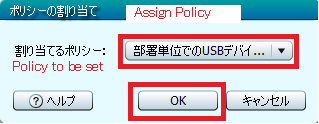
As shown in the above figure, navigate to the Security module > Device List > Action. Click on the Action drop down button, and select the Assign Policy option to open the below window. Select the appropriate policy from the Policy to be set/assigned drop down option.
Below is a list of commonly used devices that may or may not require assigning a policy before usage ;
- Internal CD Drive : Select the appropriate policy that allows USB device and CD usage. In addition CD driver installation may be required.
- External CD/BD Drive : Just the USB device registration is fine.
- Internal SD Card Reader : Select the appropriate policy that allows USB device and SD card usage.
- External SD Card Reader : Just the USB device registration is fine.
- External USB Scanner/Webcam : Select the appropriate policy that says IMG OK.
- IC Recorder : In the event list, both the USB device and portable device blockage message appears. Just the registration of USB device is fine.
- Encrypted USB memory : Just the registration of the USB device is fine, but sometimes a virtual CD drive appears. In such a case, appropriate policy wrt USB device and CD usage needs to be set.
- Non-encrypted USB memory : Just the USB device registration is fine.
- HDD USB memory : Just the registration of the USB device is fine, but sometimes a virtual CD drive appears. In such a case, appropriate policy wrt USB device and CD usage needs to be set.
- SSD USB memory : Just the USB device registration is fine.
- USB Vaccine : This device will get detected as a virtual CD drive and USB device. Just the registration of the USB device information is fine.
- Iphone/Android Smartphone/Digital Camera : Select the appropriate policy that says WPD OK.
Control network connections
You can use JP1 to prevent PCs that you are not managing from connecting to the network, ensuring that privately owned PCs cannot access the company network even by accident. For company owned PCs, you can easily grant access to verified PCs to connect to the network while you can also block PCs that are no more used.
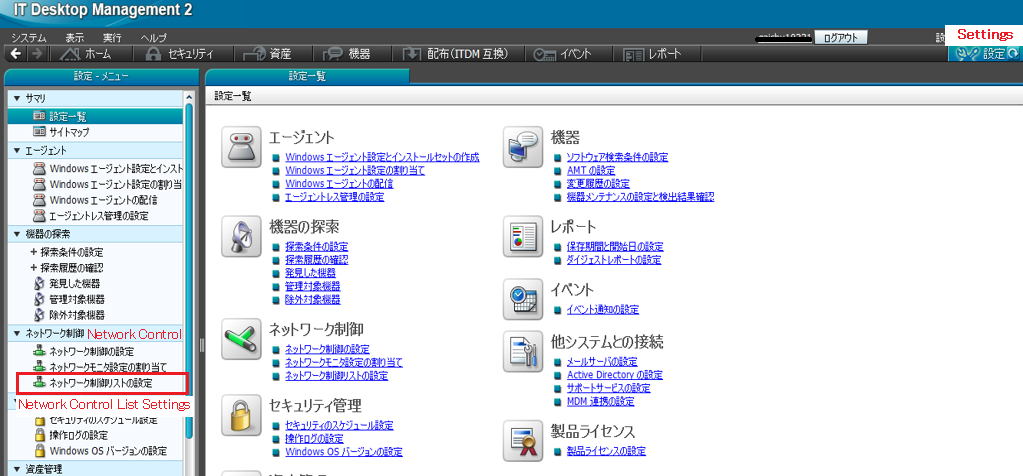
As shown above, navigate to Settings > Network Control List Settings. Search for the PC using the host name/IP address. From the search results, select the PC and click on Edit > Connect to network to select the Allow radio button. This will allow the connection of the above PC to the network. Similarly, just change the Connect to network option to Do not allow to block a PC from connecting to the network. You can also grant/block access of a PC to connect to a network under, Inventory > Device Inventory > Network List.
Implement thorough virus protections
As JP1 allows you to verify that all required security measures have been implemented, if an unsafe PC is found, you can send a message to the user of that PC to apply the necessary security measures. Navigate to Security > Computer Security Status > Device List to verify the security status of any PC and also to send message to the user if required. Furthermore, if there are PCs that are at risk because their antivirus software is not up to date, you can distribute and install the latest version of that software on these PCs.
References :
https://www.hitachi.com/products/it/software/prod/jp1/product/jp1/
http://itdoc.hitachi.co.jp/manuals/3021/3021336700e/DMKG0009.HTM
http://itdoc.hitachi.co.jp/manuals/3021/3021327600/DMUY0274.HTM
http://itdoc.hitachi.co.jp/manuals/3021/30213E1220e/DMDS0014.HTM
https://www.ashisuto.co.jp/jp1blog/article/1212448_4996.html
Further Reading :


Leave a Reply