In one of my earlier blogs, I briefly introduced the topic of forms. In this blog, “Jira Service Management Forms: Enhancing User Experience” I will dig deeper into request types and forms in Jira Service Management. Request types represent the native forms used for capturing information. However, forms offer enhanced features to request types that helps streamline the portal experience.
In your service project, agents can raise different request types, such as “Get IT help” or “Suggest improvement,” among others. These are visible on the customer portal and are the means through which customers interact with the service desk. They are user-friendly and enable your agents to assist customers more effectively by automatically sorting requests into the correct IT service management work category (Service requests, Incidents, Problems, Changes, or Post-incident reviews). Each request type is based on an issue type, and a single issue type can be the basis for many different request types.
Features
When Jira admins or project admins add a form as part of a request type, it’ll appear as one form for customers to fill out when they raise a request. Doing this lets you include conditional sections, rich formatting, and custom layouts to forms. Some of the beneficial features of forms that you can make use of is as follows.
- Enhance your requests by attaching forms to request types. You can create a native form that appears on the portal with the limited options available on request types. To enhance your requests with various options, use forms and attach them to request types. You can either create a form from scratch or make use of the existing templates.
- The dynamic forms feature helps to create forms that use conditional logic to dynamically show or hide fields, and add headings, tables, and rich formatting.
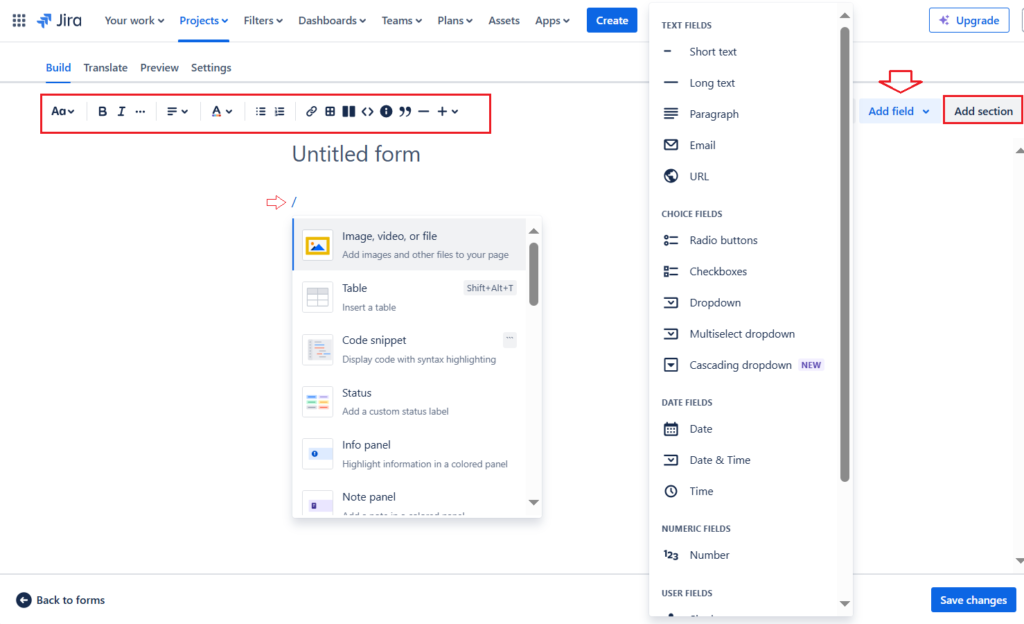
- Add external resources, utilize the slash (‘/’) command feature. On the service desk portal home page, you can specify the documents or reference links under the title Related resources. In some cases, you would like to specify links directly on the form that you are working on. In such cases, you can use the slash command, commonly found in Confluence, in the forms to display a similar menu. You can select the link option from the dropdown to add links directly to your form.
- Allow users to edit their tickets after submission with the agents help. Editing is possible as long as the option “Lock this form once it’s submitted so only admins can edit” is disabled. Then agents can reopen the ticket and navigate to the following section in the ticket,i.e. , Attached forms > Three dots > Open customer edits option. This will enable the customer edits.
- Allow the users to edit the tickets anytime on their own. To allow this, the “Keep this form open for edits” option should be enabled in the form settings. After submitting the ticket, the form will continue to be in the Open status and the customer will be able to edit it at any moment. When the customer finishes updating the form, they must save it for the changes to be reflected on the created ticket.
- Use the “Save a PDF version of this form each time it’s resubmitted” to keep track of any changes to the resubmitted form. This is helpful to review the modification history of an issue over time.
- Collect more information by attaching forms to issues. Internal and external links. You can add forms to existing issues (Example: Service requests, Incidents, Changes etc. ) and choose to make them either internal or external(Visible to customer). You can use them to request more information from customers or to complete internal processes as the issue progresses.
- Create issues using a link to a form. You can create issues using a link that goes directly to a form without needing to navigate to the portal. This allows your team to quickly create requests on your customers behalf, share the link with others, or embed into a Confluence page for quick reference.
Create a request type
Let’s create a request type and then attach a form that was created separately. To start using forms, from your service project select Project settings, then select Request types. To view the Project settings, you need to be either a project administrator or a Jira administrator.
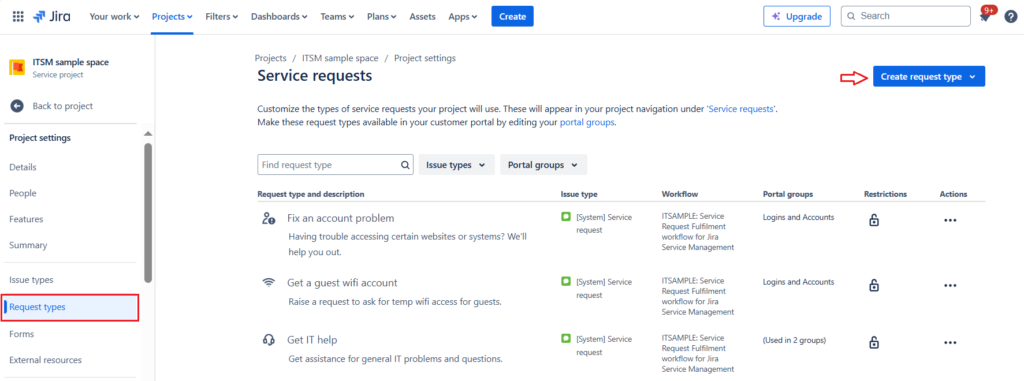
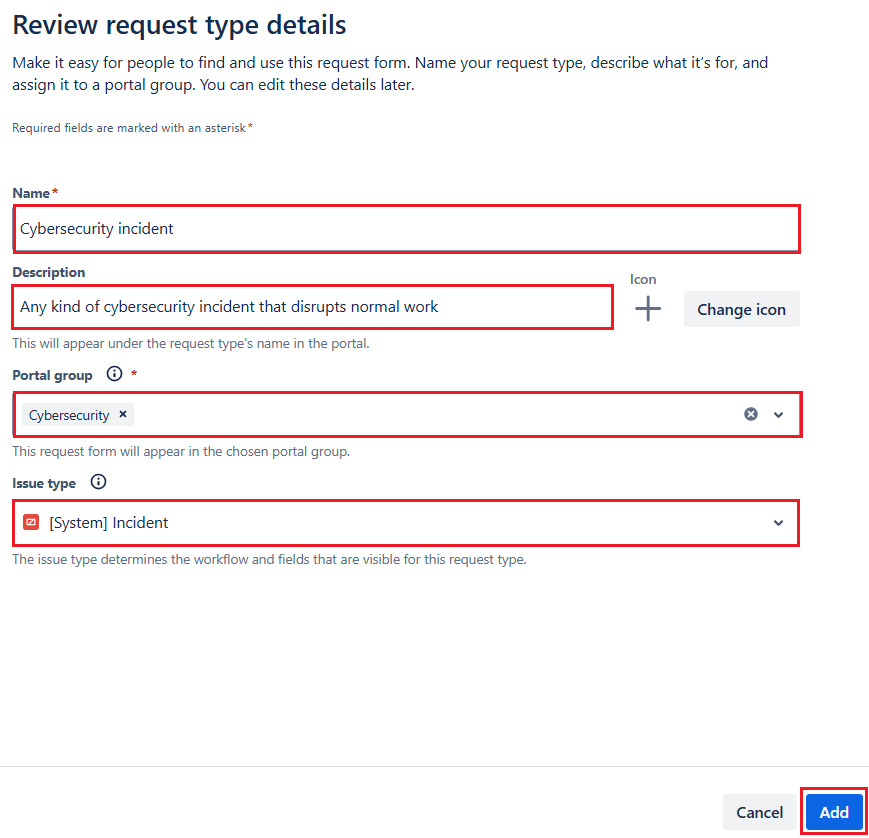
While creating a new request type you need to specify the Name, Portal group and issue type. The description section is optional. In our scenario, since it is an incident we will choose the issue type as incident.
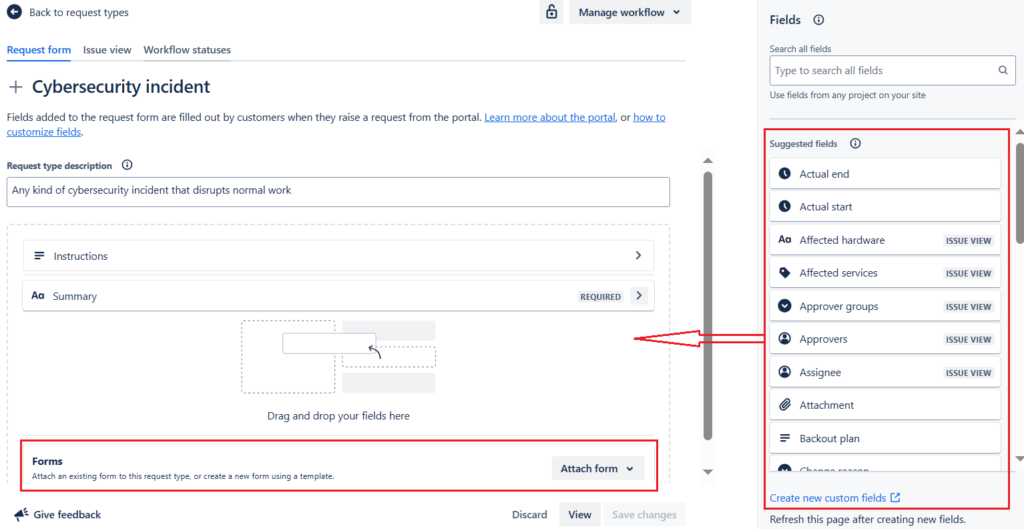
Once you click on the Add button, following is the screen that appears. Here you can edit the sections of the form that is visible to the user or customer. You can drag and drop any of the suggested fields on the right side to the left side. Since we will be needing the attachment field we will be dragging it to the left. The form that we will create later can be added here, which will enhance the features of this native form.
Create a form
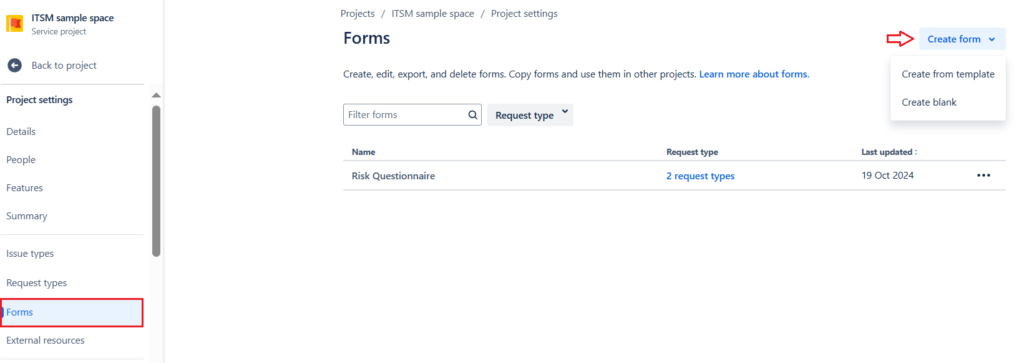
To start creating a form, navigate to the Forms section under project setting and click on the Create form button drop-down option. Select the appropriate option to create a new form from either the blank one or from an existing template.
If we are creating a new form from a blank one, click Create blank to see the below form appear. The options available are indicated in red. The top left rich text format section, the top right Add section button, the Add field button are all marked in red. In the content of the form, enter slash to display a list of options available that can further enhance the form features.
Now that we’re familiar with some basic features for getting started with forms, let’s create a simple form. The final form should appear as follows.
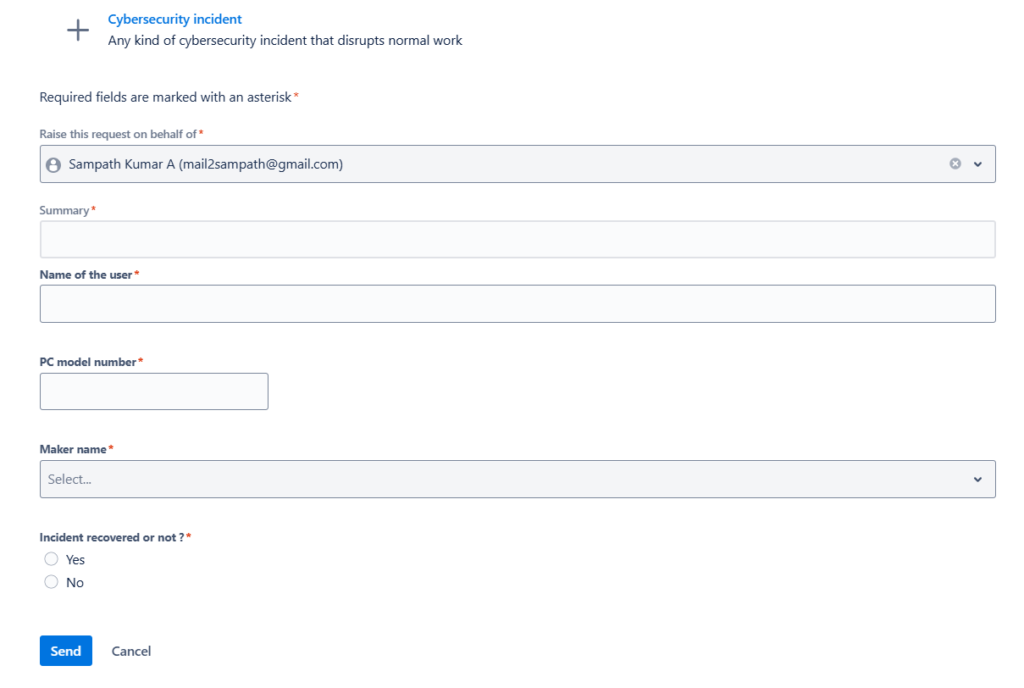
Since we have already created the request type, we will create a form that will enhance the request type sections (till Summary) to appear as above . First step would be to create a blank form by click on the Create form > Create blank option. Let us name the form as “Cybersecurity incident details”. The “Name of the user” section can be created using the Long text option under Add field. Since the red star mark is there, it will be a mandatory section to be entered. Refer to the below screenshot on where and how to set the fields.
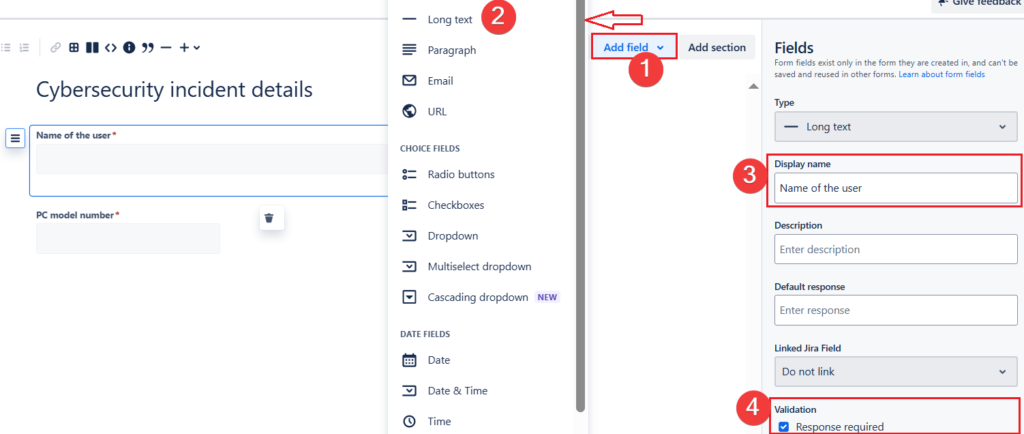
Similarly for next text box ,i.e., the “PC model number”, all the steps will be the same, expect for the selection under Add field. Here you will be selecting Short text instead of Long text option.
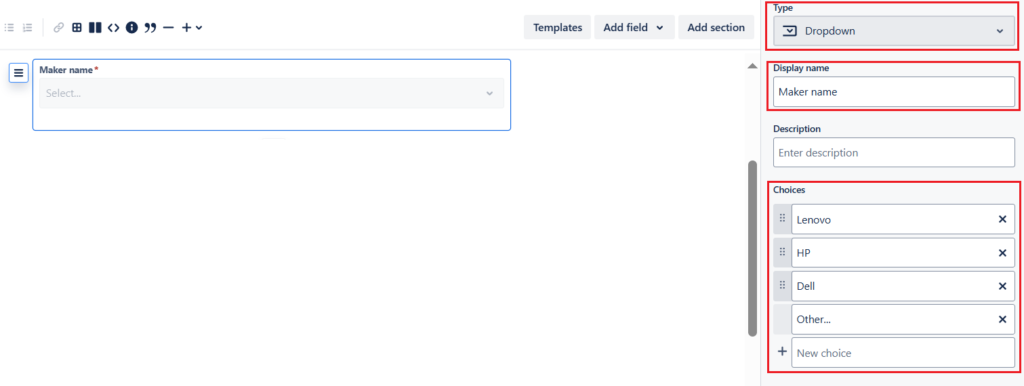
The next section is the Maker name which is a drop down option. For this, under the Add field select the Dropdown field. Enter the Display name and Choices as displayed in the below screenshot.
The following section will be the start of the dynamic form section wherein we will use the “Radio buttons” option under Add field to decide on which section to display in the latter end of the form. If Yes option is selected one form will be displayed and if No is selected another form will be displayed.
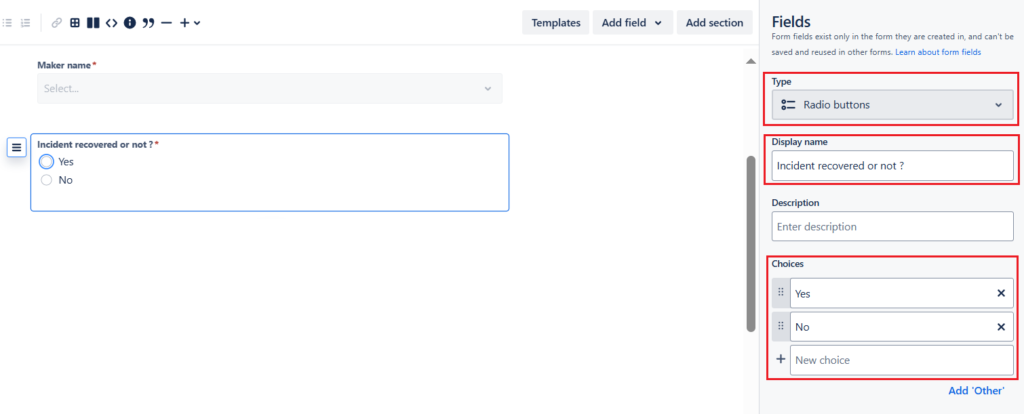
In order to start using the dynamic form, first click on the Add section button. Fill out the sections as shown in the below picture ,i.e, Name, Show section, When field, Is any of. As you can see from the below picture that the Show section, When field and Is any of: fields are drop down sections. Select the appropriate option inorder to map to the earlier radio button query and answer ,i.e, either Yes or No. The below screenshot depicts the section to be displayed when “Yes” option is selected.

The text box below is the “Provide the details of incident”, which needs to be added from the Add field section by selecting the Paragraph option.
Now that only the “No” option form remains, click the Add section button again to create the form that appears when the “No” radio button is selected.
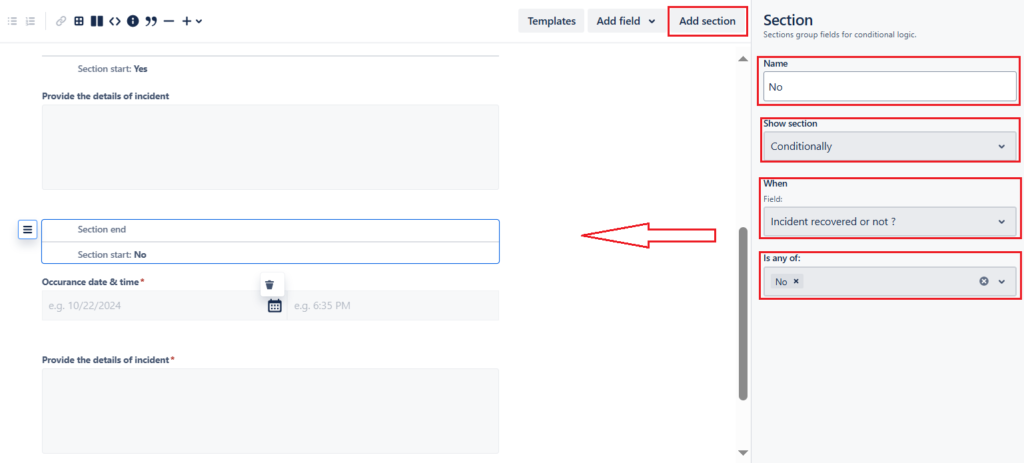
The sections below are the Date & Time , Paragraph fields available under Add field section. Name these sections appropriately so that they display correct names as above when the “No” option is selected. .
Once all sections are complete, click the Save changes button at the bottom to save the form.
Attach form to request type
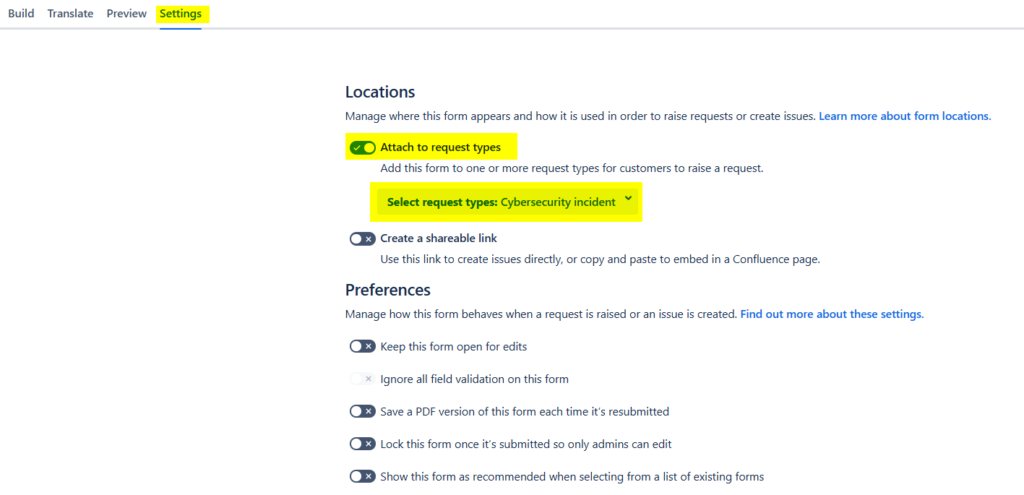
To attach the form created earlier to the request type created much earlier, navigate to the Settings tab to the top left of the screen. Here we can link our form to the request type. Please refer to the image below for details on the option that needs to be enabled. One more way to attach a form to the request type would be to navigate to the request type that we created earlier and use the Attach form button.
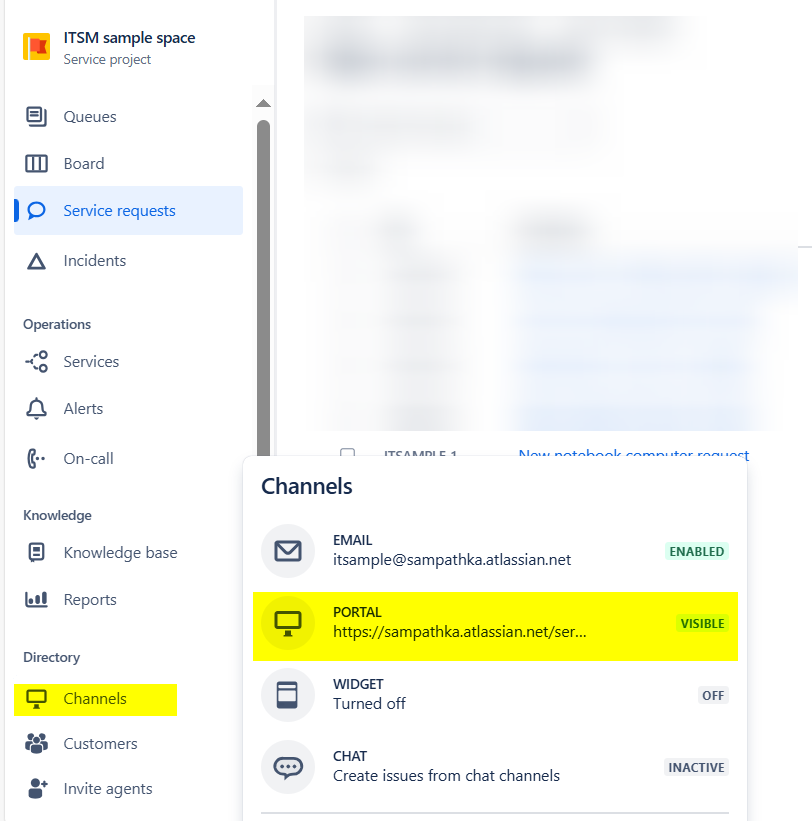
The next step would be to access the form from the portal. For this, you need to navigate to the Channels > Portal option as shown in the screenshot below.
Further Reading :

Leave a Reply