
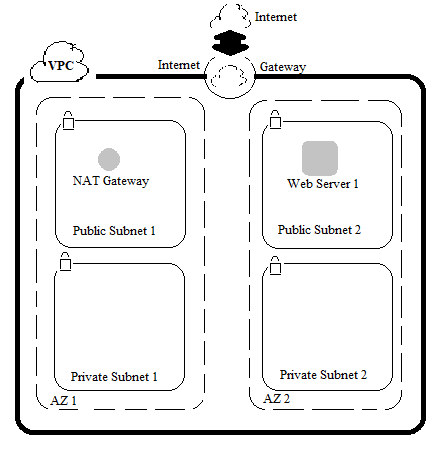
In this blog post i will take you through the steps from creating a Virtual Private Cloud (VPC) to adding additional components like Availability Zone, Subnets, EC2 Instance. Later on you will be creating security groups for the EC2 instance, configuring and customizing the EC2 instance to run a web sever and launch it into VPC. Amazon VPC enables you to launch AWS resources into a virtual network (similar to traditional network of DC) that you define, with the benefit of scalability. You can create a VPC that spans multiple Availability Zones (AZ).
Procedure
Since we will be using AWS Service here, the first step would be to login to the AWS Management Console. Login using your respective IAM user name and password. After logging on to the console, you will use the VPC wizard to create a VPC, an Internet Gateway and two subnets in a single availability zone. If a subnet’s traffic is routed to an internet gateway, the subnet is known as public subnet else known as private subnet. The wizard will also create a NAT gateway which is used to provide internet access to instances in the private subnet. The internet gateway provides bidirectional access whereas the NAT gateway provides only unidirectional ,i.e, outbound access to the internet.
Step 1 : Launch the VPC Wizard
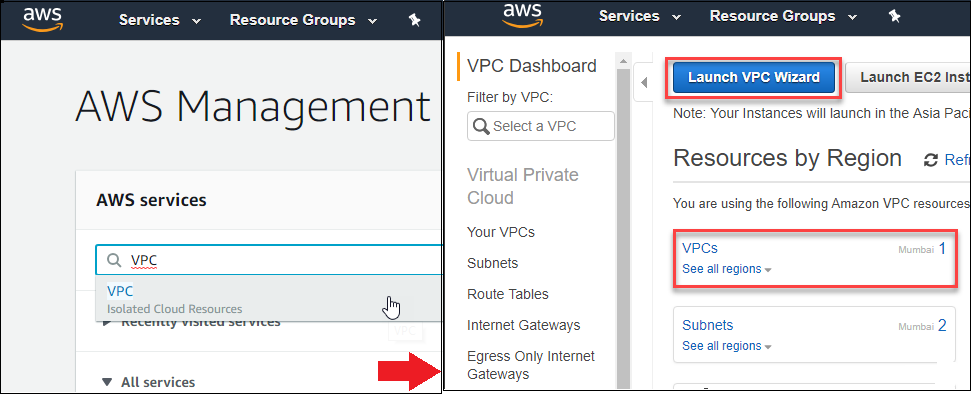
On logging in to your AWS Management console, you can see the top left screen wherein VPC letters can be typed to move to the VPC dashboard as shown in the center screen. Here click on the Launch VPC Wizard button to move to launch the wizard. On the wizard screen you can see that AWS supports 4 types of subnets for VPC. VPC with a Single Public Subnet, VPC with Public and Private Subnets, VPC with Public and Private Subnets and Hardware VPN Access, and VPC with a Private Subnet Only and Hardware VPN Access. In the current exercise, since you will be using both the public and private subnets the second option is to be selected and click on the Select button.
Step 2 : Create VPC & Subnets

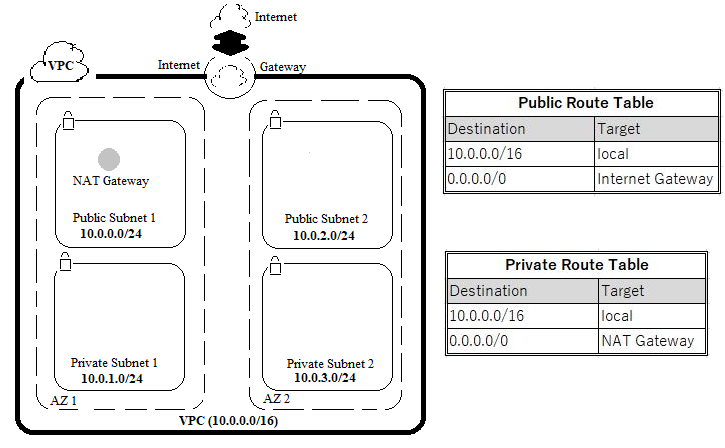
When you create a VPC, you must specify a range of IPv4 addresses for the VPC in the form of a Classless Inter-Domain Routing (CIDR) block. You can create a publicly routable CIDR block or use the standard private CIDR ranges for your VPC. The CIDR block for the VPC is set to 10.0.0.0/16. Next, the CIDR block for Public Subnet 1 and Private Subnet 1 are set to 10.0.0.0/24 and 10.0.1.0/24 respectively which means that it contains all IP addresses starting with 10.0.0.x and 10.0.1.x . When all the necessary fields are input, click on Create VPC. The wizard will now provision public subnet 1 and private subnet 1 in the same availability zone AZ1 with route tables for each subnet.

Step 3 : Create Additional Subnets
In this step you will create two additional subnets ,i.e, Public Subnet 2 and Private Subnet 2 in a second availability zone AZ2 to provide High Availability. On the VPC dashboard left navigation pane, Click Subnets. First, you will create a second public subnet by clicking on Create Subnet. Enter the other details as follows.
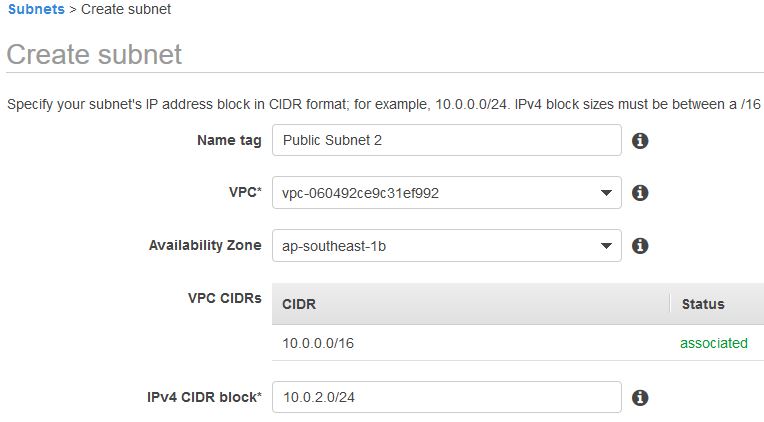
The public subnet is set to have all IP addresses starting with 10.0.2.x . Next, you will create a second private subnet by clicking on Create Subnet.
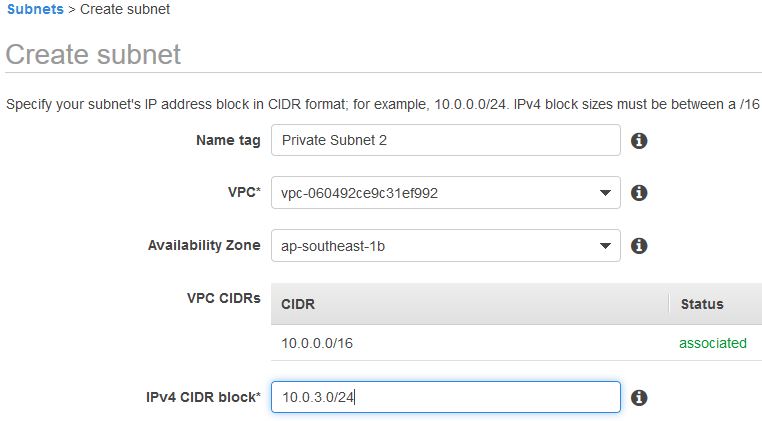
As you can see, the private subnet is set to have all IP addresses starting with 10.0.3.x .
Step 4 : Configure the Route Table of Subnets to connect to the Internet
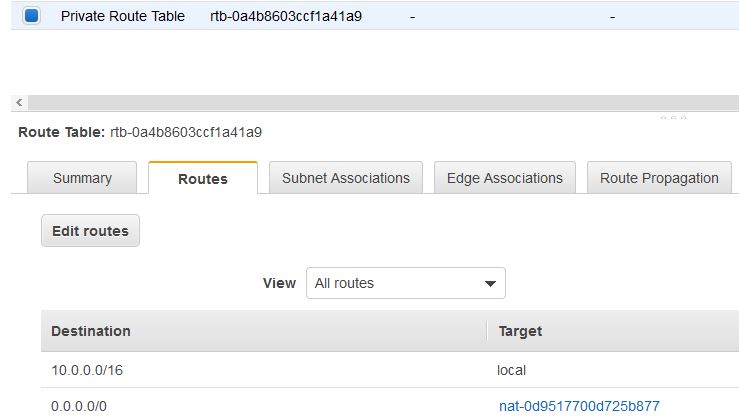
First, you will configure the private subnet to route internet bound traffic to the NAT gateway (resides in the public subnet), so that resources in the private subnet are able to connect to the internet, while still keeping the resources private. This is done by configuring the Route Table. On the left navigation pane, click Route Tables. Select the route table with VPC name as Lab VPC and Main = Yes. In the lower pane, click Routes tab. Note that the traffic destined for the internet (0.0.0.0/0) will be sent to the NAT gateway. In the upper pane Name column, click the pencil mark and then type Private Route Table to edit the name.
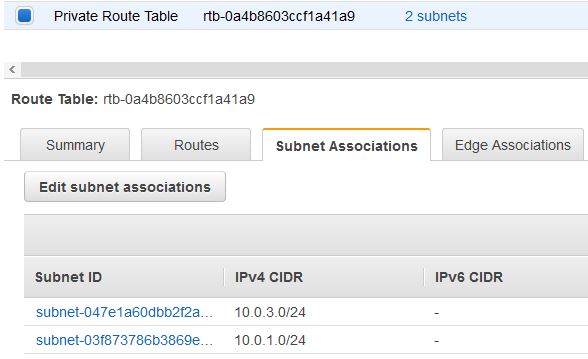
Next, click on Subnet Associations tab in the lower pane. Click Edit subnet associations button and select both the private subnet 1 and private subnet 2 and click save. Thus both the private subnets have been associated with the Private Route Table.
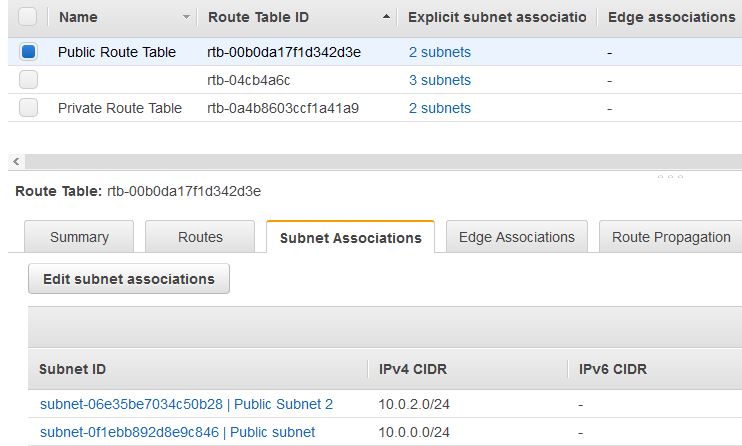
Now that you are done with configuring the route table for private subnets, you will configure the route table that is used by public subnets. Similar to the steps performed above, under the Route Tables item, select the route table with VPC name as Lab VPC and Main = Yes. Type Public Route Table to customize the name display. In the lower pane, click Routes tab. Note that the internet bound traffic (0.0.0.0/0) will be sent straight to the internet via the internet gateway.

Now you will associate the above route table with both the public subnets by moving to the Subnet Associations tab as shown below. Click Edit subnet associations button and select both the public subnet 1 and public subnet 2 and click save.
You now have a VPC with Public and Private Subnets that is configured in two Availability Zones.
Step 5 : Create a VPC Security Group
In this step you will create a VPC security group that can be associated with instances. You can add rules to each security group that allow traffic to or from its associated instances. In the left navigation pane, click Security Groups. Click Create security group and configure as follows :
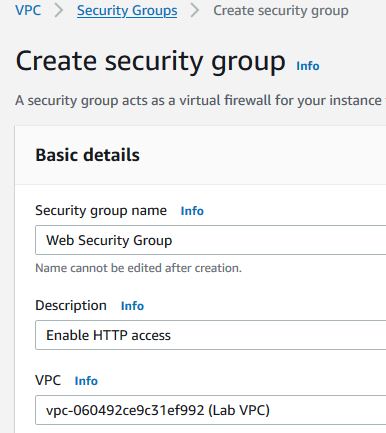
You will now add a rule to the above security group to permit inbound web requests. In the Inbound rules section, click Add rule, then configure (Type : HTTP, Source : Anywhere, Description : Permit web requests). Scroll down to click on create Create Security group. The settings will appear as follows.

Step 6 : Launch a Web Server Instance
In this step you will launch an AWS EC2 instance into the public subnet 2. This EC2 instance will be configured to act as a webserver. On the AWS Management Console Services menu, click EC2 and launch instance by clicking on the Launch Instance button. In the page, Choose an Amazon Machine Image (AMI) you can select a free tier eligible OS, Amazon Linux 2. In the next page, Choose an Instance Type you can select the hardware resources assigned to the instance. Here you can select the free tier eligible instance type, t3.micro. In the next page, Configure Instance Details you will configure the instance to launch in the public subnet 2 of the VPC by the setting, Network : Lab VPC, Subnet : Public Subnet 2, Auto-assign Public IP : Enable. Under the Advanced Details > User Data box enter the below code.
#!/bin/bash
# Install Apache Web Server and PHP
yum install -y httpd mysql php
# Turn on web server
chkconfig httpd on
service httpd start
# Create a PHP test file
usermod -a -G apache ec2-user
chown -R ec2-user:apache /var/www
chmod 2775 /var/www
find /var/www -type d -exec chmod 2775 {} \;
find /var/www -type f -exec chmod 0664 {} \;
echo "<?php phpinfo(); ?>" > /var/www/html/phpinfo.php
This script will run automatically when the instance launches for the first time. The script creates and configures a PHP test file. Next, click on the Next: Add Storage button and use the default settings. Next, click on Next: Add Tags and configure as follows. As tags are used to assign a name to the instance, you will assign the name as Web Server 1 here.

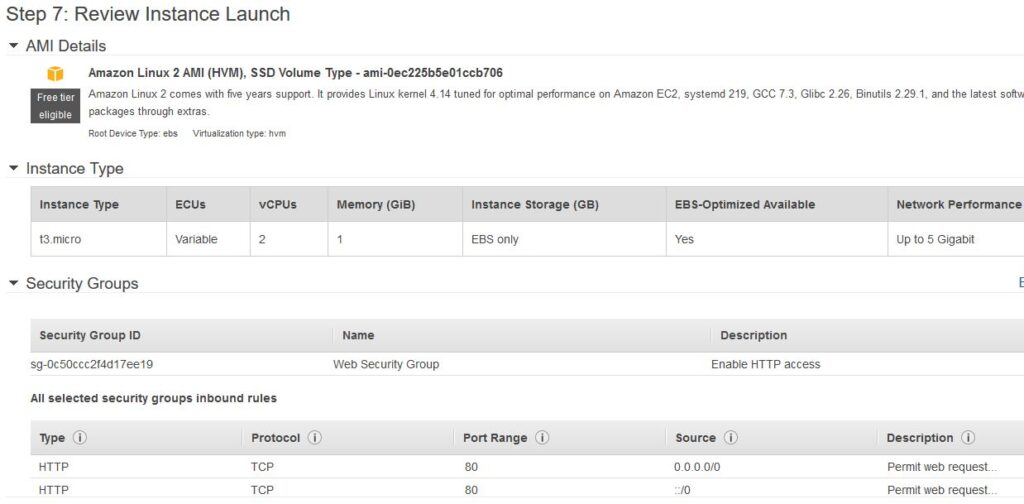
Next, click on Next: Configure Security Group and configure the instance to use the Web Security Group created in the earlier step as follows. This will permit HTTP access to the instance.

Once group is set as above, click the Review and Launch button that will display all the set parameters for review as follows. Once done, click Launch.
In the Select an existing keypair dialog, check the I acknowledge… option. Then click on the Launch Instances button followed by click View Instances to check the status. Wait until Web Server 1 shows 2/2 checks passed in the Status Checks column. Now we are ready with the Web Server.

Step 7 : Connect to the Web Server and Close
In this step you will check the connection to the webserver running on the EC2 instance through internet. Copy the Public DNS (IPv4) value shown at the bottom of the page in the Description section of the above screenshot. Open a new web browser tab, paste the Public DNS value and press Enter. Or, type the following command.
http://my.public.dns.amazonaws.com/phpinfo.php
You should see the PHP information page that confirms your web server has been launched successfully. In case you have not specified anything in the User Data box while launching the web server. The following method would be needed to connect to the Web Server.
Copy the IPv4 Public IP address from the description tab of the web server instance. Launch putty to connect to the EC2 instance/Server with SSH. Paste the earlier IP address in the Host Name/IP address section. Select the Auth item under Connection>SSH on the putty left navigation window. Navigate and select your EC2 key file on the local PC and click Open. This will open a window similar to the command prompt wherein you need to enter the default login name ec2-user and any password set for the earlier selected key file to logon to the server. The following commands need to entered.
#Change to the root user
$ sudo su -
#Install Apache Web Server
$ yum install httpd
#Start the Apache web server
$ systemctl start httpd
#Create a file and make an entry "test server"
$ vi /var/www/html/index.html
Once the Apache server is installed and a file is created, the Public DNS (IPv4) value from Step 6 should be entered into a browser. The browser should display the text entered in the file ,i.e, test server.
Return to the AWS Management Console. On the navigation bar, click your account name. A drop down menu will open and choose Sign Out.
References :
- https://docs.aws.amazon.com/awsconsolehelpdocs/latest/gsg/getting-started.html
- https://docs.aws.amazon.com/vpc/latest/userguide/VPC_Subnets.html
- https://docs.aws.amazon.com/quickstarts/latest/vmlaunch/step-1-launch-instance.html
- https://docs.aws.amazon.com/AWSEC2/latest/UserGuide/user-data.html
- https://www.guru99.com/creating-amazon-ec2-instance.html
Additional Reading :


Leave a Reply