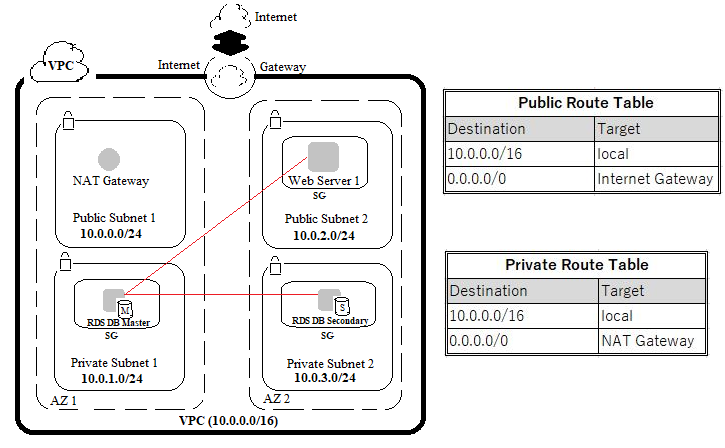
In this blog post i will take you through a step by step process of building a DB master, secondary DB and accessing the DB from your EC2 instance. The final infrastructure will appear as follows.
Step 1 : Create VPC, Subnets and EC2 instance
Let us consider that the Web server/EC2 instance is already launched. The procedure for which is detailed in one of my previous blogs. Head to the Additional Reading section of this blog for the link. Now the status is that, you have the VPC, AZ1, AZ2, Public & Private Subnet 1, Public & Private Subnet 2 and Web Server 1/EC2 instance, internet & NAT gateway ready so that you can launch the DB Server.
Step 2 : Create a Security Group for RDS DB Instance
As a first step, you will create a security group (SG) for the web server to access your RDS DB instance. From the AWS Management Console, navigate to VPC > Security Groups and click on Create security group to configure as follows.
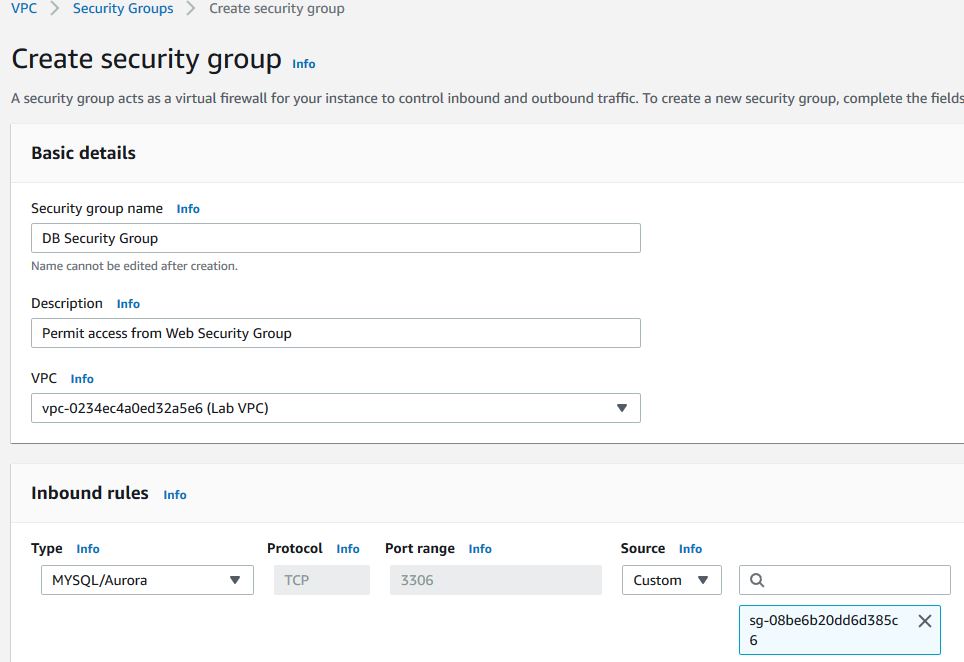
As you can see in the above screenshot, you can set the rules to the security group by specifying the same in the Inbound rules section. You can set the Web Security Group created for the Web Server since you are allowing access from the Web Server. The final picture of the setting would be as follows.

You will use this DB Security Group when launching the Amazon RDS database.
Step 3 : Create a DB Subnet Group
In this step you will create a DB subnet group that is used to tell the RDS which subnets can be used for the database. The group should contain subnets in atleast two availability zones. From the AWS Management Console, navigate to RDS > Subnet groups and click on Create DB Subnet Group and configure as follows.
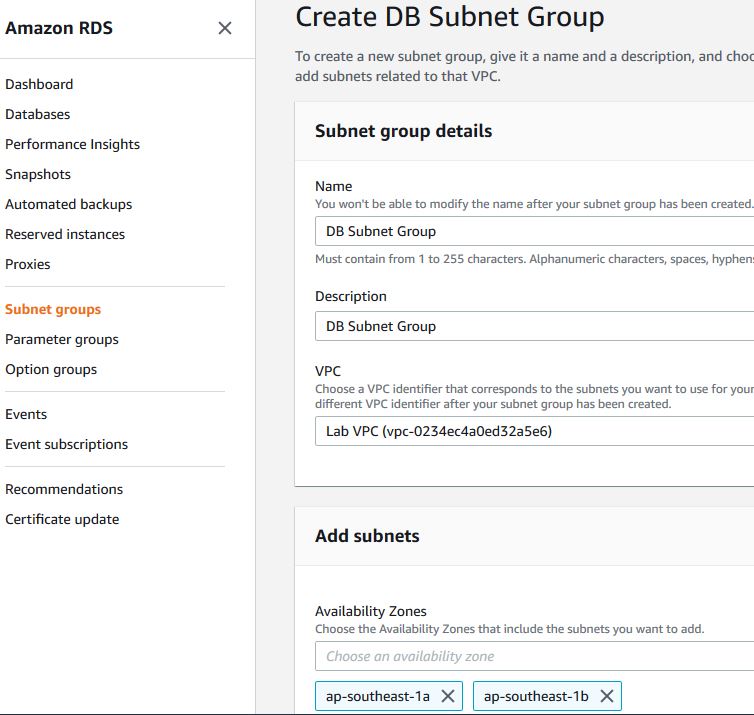
As you can see in the above screeshot, after entering the subnet group details you need to add the two availability zone information. This is followed by selecting the necessary subnets ,i.e, private subnet 1(10.0.1.0/24) & private subnet 2(10.0.3.0/24) from their respective availability zone and click create. You will use this group while creating the database in the next step.
Step 4 : Launch a Multi-AZ Amazon RDS DB Instance
Amazon Relational Database Service (Amazon RDS) provides you with multiple database engines to choose from: Amazon Aurora, Oracle, Microsoft SQL Server, PostgreSQL, MySQL and MariaDB. When you provision a multi-AZ DB instance, Amazon RDS automatically creates a primary DB instance and synchronously replicates the data to a standby instance in another AZ.
On the left navigation pane, select Databases and click Create database to configure the details and create your DB. The below screenshot shows the summary details after the database is created.
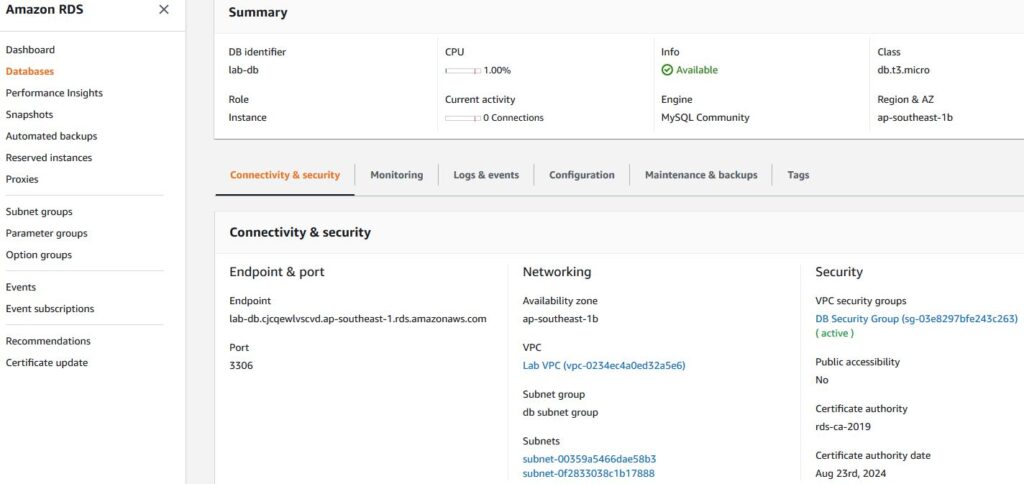
As you can see, MySQL DB engine is used and the earlier created DB subnet group has been selected. Once the Create database button is clicked the database will be launched in a few minutes. The info item as shown in the above screenshot should change from Creating to Available for successful DB launch completion. Copy the Endpoint field from the above for later use.
Step 5 : Connect to your Database
Copy the IPv4 Public IP address from the description tab of the web server instance. Launch putty to connect to the EC2 instance/Server with SSH. Paste the earlier IP address in the Host Name/IP address section. Select the Auth item under Connection>SSH on the putty left navigation window. Navigate and select your EC2 key file on the local PC and click Open. This will open a window similar to the command prompt wherein you need to enter the default login name ec2-user and any password set for the earlier selected key file. Now you have logged on to the server. Type in the following commands to connect to RDS and perform the initial tests on the database.
#Install MySQL client
$ sudo yum install mysql
#Connect to the RDS DB
$ mysql -h <Endpointinfo> -u <dbadminusrnameinfo> -p
#Display the existing databases
MySQL [(none)]> show databases;
#Use any database from the list, "lab-db" used here
MySQL [(none)]> use lab-db;
#Create a table abc
MySQL [lab-db]> create table abc (name VARCHAR(25), batch INT(5), phone VARCHAR(17));
#Insert values in the table abc
MySQL [lab-db]> insert into abc values ('Sampath', 1, 1234567);
#display the contents of the table abc to verify
MySQL [lab-db]> select * from abc;
After the installation of MySQL client, dbadmin password that was set during the launch of Amazon RDS instance will be prompted that needs to be entered to connect to the DB. Once connected, execute the commands as mentioned above to test the connection to database.
Return to the AWS Management Console. On the navigation bar, click your account name. A drop down menu will open and choose Sign Out.
References :
- https://docs.aws.amazon.com/AmazonRDS/latest/UserGuide/CHAP_GettingStarted.CreatingConnecting.MySQL.html
- https://aws.amazon.com/getting-started/hands-on/create-mysql-db/
- https://aws.amazon.com/premiumsupport/knowledge-center/rds-mysql-ssh-workbench-connect-ec2/
Additional Reading :


Leave a Reply